ProblemIf you have a requirement to install multiple SQL Server instances with the same settings, you most likely want to do it without following the numerous manual installation steps. The below tip will guide you through how to install a SQL Server instance with less effort.
Solution
http://www.mssqltips.com/sqlservertip/2511/standardize-sql-server-installations-with-configuration-files/
Sunday, October 23, 2011


Tuesday, October 18, 2011
Script to get the CPU and Memory Information
You can execute the below script to get the processor and memory information.
[sourcecode language="sql"]
-- Scritp to get Processor Info from Registry
EXEC xp_instance_regread
'HKEY_LOCAL_MACHINE',
'HARDWARE\DESCRIPTION\System\CentralProcessor\0',
'ProcessorNameString';
-- Script to get CPU and Memory Info
SELECT
cpu_count AS [Number of Logical CPU]
,hyperthread_ratio
,cpu_count/hyperthread_ratio AS [Number of Physical CPU]
,physical_memory_in_bytes/1048576 AS [Total Physical Memory IN MB]
FROM sys.dm_os_sys_info OPTION (RECOMPILE);
[/sourcecode]

[sourcecode language="sql"]
-- Scritp to get Processor Info from Registry
EXEC xp_instance_regread
'HKEY_LOCAL_MACHINE',
'HARDWARE\DESCRIPTION\System\CentralProcessor\0',
'ProcessorNameString';
-- Script to get CPU and Memory Info
SELECT
cpu_count AS [Number of Logical CPU]
,hyperthread_ratio
,cpu_count/hyperthread_ratio AS [Number of Physical CPU]
,physical_memory_in_bytes/1048576 AS [Total Physical Memory IN MB]
FROM sys.dm_os_sys_info OPTION (RECOMPILE);
[/sourcecode]

Customizing the Status Bar for each SQL Server Instance registered in CMS
Problem:
Steps to distinguish production and non-production SQL Servers registered in CMS while executing the query. Below article will guide you how to use customize colors in CMS.
Solution
To identify the production and non-production SQL Instances registered in CMS within the same group; you can use the Custom Color feature. In this article I will guide how to use to the custom color feature of CMS.
Step 1: Connect to Central Management Server (CMS) from SSMS.

Step 2: Right click on the registered CMS server and select properties.

Step 3:Go to Connection Properties tab, checked the Use Custom color box and select the desired color. Click on Save to proceed.

Step 4: Right click on the SQL Instance and Open a new query window. You can see the blue color in the status bar. This way we can identify the production and non-production box. By specifying the custom colors.
Ouput Image of SSMS

Steps to distinguish production and non-production SQL Servers registered in CMS while executing the query. Below article will guide you how to use customize colors in CMS.
Solution
To identify the production and non-production SQL Instances registered in CMS within the same group; you can use the Custom Color feature. In this article I will guide how to use to the custom color feature of CMS.
Step 1: Connect to Central Management Server (CMS) from SSMS.

Step 2: Right click on the registered CMS server and select properties.

Step 3:Go to Connection Properties tab, checked the Use Custom color box and select the desired color. Click on Save to proceed.

Step 4: Right click on the SQL Instance and Open a new query window. You can see the blue color in the status bar. This way we can identify the production and non-production box. By specifying the custom colors.
Ouput Image of SSMS

Monday, October 17, 2011
Monday, October 10, 2011
T-SQL to Check SQL ErrorLog file location
At the start up of SQL Server records the startup parameter details into the error log.
You can query the error log to check the error log file physical location.
[sourcecode language="sql"]
USE master
GO
xp_readerrorlog 0, 1, N'Logging SQL Server messages in file', NULL, NULL, N'asc'
GO
[/sourcecode]
You can query the error log to check the error log file physical location.
[sourcecode language="sql"]
USE master
GO
xp_readerrorlog 0, 1, N'Logging SQL Server messages in file', NULL, NULL, N'asc'
GO
[/sourcecode]
Wednesday, September 28, 2011
Useful queries while troubleshooting Database Mirroring
Useful queries while troubleshooting Database Mirroring
Query to check the associated ports with DB Mirroring
[sourcecode language="sql"]
SELECT type_desc, port FROM sys.tcp_endpoints;
GO
[/sourcecode]
Query to check the state of the DB Mirroring
[sourcecode language="sql"]
SELECT state_desc FROM sys.database_mirroring_endpoints
GO
[/sourcecode]
Query to check the service account connect permission on the DB Mirror endpoints
[sourcecode language="sql"]
SELECT 'Metadata Check';
SELECT EndPnt.name, SvrPerm.STATE,
CONVERT(nvarchar(38), suser_name(SvrPerm.grantor_principal_id))
AS GRANTOR,
SvrPerm.TYPE AS PERMISSION,
CONVERT(nvarchar(46),suser_name(SvrPerm.grantee_principal_id))
AS GRANTEE
FROM sys.server_permissions SvrPerm, sys.endpoints EndPnt
WHERE SvrPerm.major_id = EndPnt.endpoint_id
ORDER BY Permission, grantor, grantee;
GO
[/sourcecode]
Query to check the DB Mirror timeout and resetting the DB Mirror timeout
[sourcecode language="sql"]
SELECT mirroring_connection_timeout
FROM
sys.database_mirroring
GO
ALTER DATABASE SQLDBPOOL SET PARTNER TIMEOUT 15
GO
[/sourcecode]
Query to check the associated ports with DB Mirroring
[sourcecode language="sql"]
SELECT type_desc, port FROM sys.tcp_endpoints;
GO
[/sourcecode]
Query to check the state of the DB Mirroring
[sourcecode language="sql"]
SELECT state_desc FROM sys.database_mirroring_endpoints
GO
[/sourcecode]
Query to check the service account connect permission on the DB Mirror endpoints
[sourcecode language="sql"]
SELECT 'Metadata Check';
SELECT EndPnt.name, SvrPerm.STATE,
CONVERT(nvarchar(38), suser_name(SvrPerm.grantor_principal_id))
AS GRANTOR,
SvrPerm.TYPE AS PERMISSION,
CONVERT(nvarchar(46),suser_name(SvrPerm.grantee_principal_id))
AS GRANTEE
FROM sys.server_permissions SvrPerm, sys.endpoints EndPnt
WHERE SvrPerm.major_id = EndPnt.endpoint_id
ORDER BY Permission, grantor, grantee;
GO
[/sourcecode]
Query to check the DB Mirror timeout and resetting the DB Mirror timeout
[sourcecode language="sql"]
SELECT mirroring_connection_timeout
FROM
sys.database_mirroring
GO
ALTER DATABASE SQLDBPOOL SET PARTNER TIMEOUT 15
GO
[/sourcecode]
Thursday, September 22, 2011
Create a 32-bit DSN on 64-bit machine for SQL Server
Problem
During the install of an application on a 64-bit Windows machine, the application was unable to list the ODBC System DSN because it had been setup as a 64-bit DSN and the application needed a 32-bit system DSN for connectivity to SQL Server. In this tip, we cover how to create a 32-bit DSN on 64-bit machine.
Solution
http://www.mssqltips.com/sqlservertip/2498/create-a-32bit-dsn-on-64bit-machine-for-sql-server/
During the install of an application on a 64-bit Windows machine, the application was unable to list the ODBC System DSN because it had been setup as a 64-bit DSN and the application needed a 32-bit system DSN for connectivity to SQL Server. In this tip, we cover how to create a 32-bit DSN on 64-bit machine.
Solution
http://www.mssqltips.com/sqlservertip/2498/create-a-32bit-dsn-on-64bit-machine-for-sql-server/
Monday, September 12, 2011
How to configure SQL to listen on Multiple Ports?
Problem
Recently I came across a situation where an existing production SQL Server default instance was configured to use static TCP/IP port 48030 and the default 1433 port was disabled. A number of database applications are hosted on the same default SQL instance and these applications are connecting to SQL Server through port 48030. As per a new business requirement we need to host a new application database on the same SQL instance, but the application is unable to connect to the SQL instance because it us hard corded to use the default port 1433. In this tip we walk through how to configure a SQL instance to listen on multiple TCP/IP ports.
Solution
For solution please check http://www.mssqltips.com/sqlservertip/2493/configuring-sql-server-to-use-multiple-ports/ URL.
Recently I came across a situation where an existing production SQL Server default instance was configured to use static TCP/IP port 48030 and the default 1433 port was disabled. A number of database applications are hosted on the same default SQL instance and these applications are connecting to SQL Server through port 48030. As per a new business requirement we need to host a new application database on the same SQL instance, but the application is unable to connect to the SQL instance because it us hard corded to use the default port 1433. In this tip we walk through how to configure a SQL instance to listen on multiple TCP/IP ports.
Solution
For solution please check http://www.mssqltips.com/sqlservertip/2493/configuring-sql-server-to-use-multiple-ports/ URL.
Tuesday, July 26, 2011
Script to Get Available and Free Disk Space for SQL Server
Problem
Often we face the situation where we need to check the total disk space and available disk space for both physical and LUN/Mount drives. The extended stored procedure XP_FixedDrives is unable to help us in this scenario, so we have to log into the machine to check the total and free disk space for each physical/LUN/mount drive. In this tip, I show how this can be done using PowerShell.
Solution
http://www.mssqltips.com/tip.asp?tip=2444
Often we face the situation where we need to check the total disk space and available disk space for both physical and LUN/Mount drives. The extended stored procedure XP_FixedDrives is unable to help us in this scenario, so we have to log into the machine to check the total and free disk space for each physical/LUN/mount drive. In this tip, I show how this can be done using PowerShell.
Solution
http://www.mssqltips.com/tip.asp?tip=2444
Monday, July 25, 2011
Difference between temporary table and table variable
Temporary TablesThere are two types of temporary tables:
Local Temporary Table: Local temporary tables are visible only to their creators during the same connection to an instance of SQL Server as when the tables were first created or referenced. Local temporary tables are deleted after the user disconnects from the instance of SQL Server
You can create local temporary table adding # sign again the table name
Global Temporary Table: Global temporary tables are visible to any user and any connection after they are created, and are deleted when all users that are referencing the table disconnect from the instance of SQL Server.
You can create global temporary table adding ## sign again the table name
What are the things you can do with the temporary tables?
-Add/drop constraints except foreign key
-You can perform DDL statements (Alter, Drop)
-Create clustered and non-clustered indexes
-Use identity columns
-Use it in transaction and it support transaction
-Perform any DML operations (SELECT, INSERT, UPDATE, DELETE)
-Create the table with same name using different session; make sure constraint name must be different in the table.
[sourcecode language="sql"]
-- Adding the constraint primary key and unique key
-- constraint will create the cluster and non-cluster index
create table #temptbl
(id int identity (100,1) Primary key,
data varchar(20) constraint UK Unique
)
insert into #temptbl values ('Jugal')
insert into #temptbl values ('Jugal1')
insert into #temptbl values ('Jugal2')
select * from #temptbl
sp_help #temptbl
--Adding column to existing temporary table
alter table #temptbl
Add Name varchar(20) null
-- Modifying column
alter table #temptbl
alter column name varchar(30)
--adding index
create nonclustered index UK2 on #temptbl (name)
--checking indexes
sp_helpindex #temptbl
-- Supports transaction
begin tran
insert into #temptbl values('sqldbpool','sqldbpool')
rollback
select * from #temptbl
--Checking for the foreign key
create table #temptbl1
(
id int constraint FK1 references #temptbl1(id),
value int
)
--Skipping FOREIGN KEY constraint 'FK1' definition for temporary table. FOREIGN KEY constraints are not enforced on local or global temporary tables.
insert into #temptbl1 values(2000,10)
--DML Opertaions
select * from #temptbl
update #temptbl set data = 'SQLDBPool'
where id = 100
select * from #temptbl
delete from #temptbl where id = 101
select * from #temptbl
--dropping temporary table
drop table #temptbl
[/sourcecode]
Table variableThe syntax for creating table variables is quite similar to creating either regular or temporary tables. The only differences involve a naming convention unique to variables in general, and the need to declare the table variable as you would any other local variable in Transact SQL. Life span of the table variable is limited to life of the transaction. You can only create the cluster index on table variable.
[sourcecode language="sql"]
-- creating table variable
declare @var table
(id int identity(100,1) primary key,
data varchar(20) default 'hi'
)
--Checking DML Statement --working fine
insert into @var values('jugal')
insert into @var values('sqldbpool')
delete from @var where id = 100
update @var set data = 'sqldbpool-1' where id = 101
select * from @var
-- Checking transaction support/doesn't support transaction
begin tran
declare @var table
(id int identity(100,1) primary key,
data varchar(20) default 'hi'
)
insert into @var values('jugal')
insert into @var values('sqldbpool')
insert into @var values (DEFAULT)
delete from @var where id = 100
update @var set data = 'sqldbpool-1' where id = 101
rollback
select * from @var
-- Checking alter failed/doesn't support DDL
alter table @var
alter column data varchar(30)
alter table @var
Add Name varchar(20) null
[/sourcecode]
Similarities between temporary tables and table variable:- Both are created in tempdb
- You can create constraint like primary key, default and check on both but the table variable has certain limitation for the default and check constrain where you can not use UDF
- Clustered indexes can be created on table variables and temporary tables
- Both are logged in the transaction log but the tempDB recovery model is SIMPLE, log will be truncated once the trasaction get complete.
Just as with temp and regular tables, users can perform all Data Modification Language (DML) queries against a table variable: SELECT, INSERT, UPDATE, and DELETE.
Differences
- You can not create non-cluster index and statistics on table variable but you can create it on temporary table.
- You can not use DDL statement on table variable but you can use it on temporary table.
- Table variable doesn't support transaction wheras temporary table supports.
Local Temporary Table: Local temporary tables are visible only to their creators during the same connection to an instance of SQL Server as when the tables were first created or referenced. Local temporary tables are deleted after the user disconnects from the instance of SQL Server
You can create local temporary table adding # sign again the table name
Global Temporary Table: Global temporary tables are visible to any user and any connection after they are created, and are deleted when all users that are referencing the table disconnect from the instance of SQL Server.
You can create global temporary table adding ## sign again the table name
What are the things you can do with the temporary tables?
-Add/drop constraints except foreign key
-You can perform DDL statements (Alter, Drop)
-Create clustered and non-clustered indexes
-Use identity columns
-Use it in transaction and it support transaction
-Perform any DML operations (SELECT, INSERT, UPDATE, DELETE)
-Create the table with same name using different session; make sure constraint name must be different in the table.
[sourcecode language="sql"]
-- Adding the constraint primary key and unique key
-- constraint will create the cluster and non-cluster index
create table #temptbl
(id int identity (100,1) Primary key,
data varchar(20) constraint UK Unique
)
insert into #temptbl values ('Jugal')
insert into #temptbl values ('Jugal1')
insert into #temptbl values ('Jugal2')
select * from #temptbl
sp_help #temptbl
--Adding column to existing temporary table
alter table #temptbl
Add Name varchar(20) null
-- Modifying column
alter table #temptbl
alter column name varchar(30)
--adding index
create nonclustered index UK2 on #temptbl (name)
--checking indexes
sp_helpindex #temptbl
-- Supports transaction
begin tran
insert into #temptbl values('sqldbpool','sqldbpool')
rollback
select * from #temptbl
--Checking for the foreign key
create table #temptbl1
(
id int constraint FK1 references #temptbl1(id),
value int
)
--Skipping FOREIGN KEY constraint 'FK1' definition for temporary table. FOREIGN KEY constraints are not enforced on local or global temporary tables.
insert into #temptbl1 values(2000,10)
--DML Opertaions
select * from #temptbl
update #temptbl set data = 'SQLDBPool'
where id = 100
select * from #temptbl
delete from #temptbl where id = 101
select * from #temptbl
--dropping temporary table
drop table #temptbl
[/sourcecode]
Table variableThe syntax for creating table variables is quite similar to creating either regular or temporary tables. The only differences involve a naming convention unique to variables in general, and the need to declare the table variable as you would any other local variable in Transact SQL. Life span of the table variable is limited to life of the transaction. You can only create the cluster index on table variable.
[sourcecode language="sql"]
-- creating table variable
declare @var table
(id int identity(100,1) primary key,
data varchar(20) default 'hi'
)
--Checking DML Statement --working fine
insert into @var values('jugal')
insert into @var values('sqldbpool')
delete from @var where id = 100
update @var set data = 'sqldbpool-1' where id = 101
select * from @var
-- Checking transaction support/doesn't support transaction
begin tran
declare @var table
(id int identity(100,1) primary key,
data varchar(20) default 'hi'
)
insert into @var values('jugal')
insert into @var values('sqldbpool')
insert into @var values (DEFAULT)
delete from @var where id = 100
update @var set data = 'sqldbpool-1' where id = 101
rollback
select * from @var
-- Checking alter failed/doesn't support DDL
alter table @var
alter column data varchar(30)
alter table @var
Add Name varchar(20) null
[/sourcecode]
Similarities between temporary tables and table variable:- Both are created in tempdb
- You can create constraint like primary key, default and check on both but the table variable has certain limitation for the default and check constrain where you can not use UDF
- Clustered indexes can be created on table variables and temporary tables
- Both are logged in the transaction log but the tempDB recovery model is SIMPLE, log will be truncated once the trasaction get complete.
Just as with temp and regular tables, users can perform all Data Modification Language (DML) queries against a table variable: SELECT, INSERT, UPDATE, and DELETE.
Differences
- You can not create non-cluster index and statistics on table variable but you can create it on temporary table.
- You can not use DDL statement on table variable but you can use it on temporary table.
- Table variable doesn't support transaction wheras temporary table supports.
Wednesday, July 6, 2011
MySQL Replication Setup
Mysql uses a Master-slave/Publisher-Subscriber model for Replication. MySQL replication is an asynchronous replication. In MySQL replication master keeps a log of all of the updates performed on the database. Then, one or more slaves connect to the Master(Publisher Server), read each log entry, and perform the indicated update on the slave (Subscriber) server databases. The master server is responsible for the track of log rotation and access control.
Each slave server has to keep the track of current position within the server's transaction log. As new transactions occur on the server, they get logged on the master server and downloaded by each slave. Once the transaction has been committed by each slave, the slaves update their position in the server's transaction log and wait for the next transaction.
In this article, I will show you the steps to configure the Master/Slave replication between two servers.
Step 1: Create a user on Master server which Slave server can use to connect. I have created the user named "repl_user".
[sourcecode language="sql"]
--Connect to MySQL Master server
mysql -u root -proot
--Execute the below code
GRANT REPLICATION SLAVE ON *.* TO 'repl_user'@'%' IDENTIFIED BY 'password';
FLUSH PRIVILEGES;
[/sourcecode]
Step 2: We have to change the MySQL configuration file usually in the /etc/mysql.cnf location. Here we will add the replication configuration parameters.
log-bin – will be used to write a log on the desired location
binlog-do-db – will be used to enabled the database for writing log. I have used Publisher_Database, you have to specify your database name.
server-id – Specify the ID of the Master server
[sourcecode language="sql"]
log-bin = /home/mysql/logs/mysql-bin.log
binlog-do-db=publisher_database
server-id=1
[/sourcecode]
Step 3: Once you have added the above configuration parameters into the My.cnf, next step is restart the MySQL Master Instance.
You can use below command to restart the MySQl service.
[sourcecode language="sql"]
/etc/init.d/mysqld restart
service mysqld restart
[/sourcecode]
Step 4: We have to configure the /etc/my.cnf file on the slave server. Here we will add the below parameters in the configuration file.
server-id - gives the Slave its unique ID
master-host - tells the Slave the I.P address of the Master server for connection. You can get the IP address using IPConfig command.
master-connect-retry - Here we will specify the connection retry interval.
master-user - Specify the user which has permission access the Master server
master-password - Specify the password of the replication user mentioned above
replicate-do-db - Specify the subscriber database name
relay-log - direct slave to use relay log
[sourcecode language="sql"]
server-id=2
master-host=128.20.30.1
master-connect-retry=60
master-user=repl_user
master-password=password
replicate-do-db=subscriber_slave
relay-log = /var/lib/mysql/slave-relay.log
relay-log-index = /var/lib/mysql/slave-relay-log.index
[/sourcecode]
Step 5: Restart the slave MySQl instance
[sourcecode language="sql"]
/etc/init.d/mysqld restart
service mysqld restart
[/sourcecode]
Step 6: If your Master MySQL instance is live instance, you have to do the backup/restore using MySQLDump utility.
[sourcecode language="sql"]
--Connect to MySQL Master server
mysql -u root -proot
--Stop the write operation
FLUSH TABLES WITH READ LOCK;
--Generate the dump of the database (backup)
--gzip command will compress the file and create the zip file name backup.sql.gz
mysqldump publisher_master -u root -p > /home/my_home_dir/backup.sql;
gzip /home/my_home_dir/backup.sql;
--execute below copy command on slave to copy the backup file
scp root@128.20.30.1:/home/my_home_dir/database.sql.gz /home/my_home_dir/
--Once copied, extract the file using gunzip
gunzip /home/my_home_dir/backup.sql.gz
--restore the databsae
mysql -u root -p subscriber_slave </home/my_home_dir/backup.sql
[/sourcecode]
Step 7: Execute the SHOW MASTER STATUS command on Master server. It will give you the bin log file name and position which we will use specify the slave.
[sourcecode language="sql"]
SHOW MASTER STATUS;
[/sourcecode]
Step 8: Execute the below commands on slave.
[sourcecode language="sql"]
--Connect to MySQL Slave server
mysql -u root -proot
--stop the slave
slave stop;
-- Execute the below command
CHANGE MASTER TO MASTER_HOST='128.20.30.1', MASTER_USER='repl_user', MASTER_PASSWORD='password', MASTER_LOG_FILE='mysql-bin.000001', MASTER_LOG_POS=707;
--Start the Slave
slave start;
[/sourcecode]
Step 9: Login to Master MySQL instance and unlock the tables.
[sourcecode language="sql"]
--Connect to MySQL Master server
mysql -u root -proot
-- unlock the tables if you have executed lock tables command
unlock tables;
[/sourcecode]
You are all set. Master to Slave replication has been started. Make sure while configuring the my.cnf file.
1. Take the copy of my.cnf file before starting the replication configuration.
2. Make sure skip-networking parameter is not enabled in the my.cnf file.
Each slave server has to keep the track of current position within the server's transaction log. As new transactions occur on the server, they get logged on the master server and downloaded by each slave. Once the transaction has been committed by each slave, the slaves update their position in the server's transaction log and wait for the next transaction.
In this article, I will show you the steps to configure the Master/Slave replication between two servers.
Step 1: Create a user on Master server which Slave server can use to connect. I have created the user named "repl_user".
[sourcecode language="sql"]
--Connect to MySQL Master server
mysql -u root -proot
--Execute the below code
GRANT REPLICATION SLAVE ON *.* TO 'repl_user'@'%' IDENTIFIED BY 'password';
FLUSH PRIVILEGES;
[/sourcecode]
Step 2: We have to change the MySQL configuration file usually in the /etc/mysql.cnf location. Here we will add the replication configuration parameters.
log-bin – will be used to write a log on the desired location
binlog-do-db – will be used to enabled the database for writing log. I have used Publisher_Database, you have to specify your database name.
server-id – Specify the ID of the Master server
[sourcecode language="sql"]
log-bin = /home/mysql/logs/mysql-bin.log
binlog-do-db=publisher_database
server-id=1
[/sourcecode]
Step 3: Once you have added the above configuration parameters into the My.cnf, next step is restart the MySQL Master Instance.
You can use below command to restart the MySQl service.
[sourcecode language="sql"]
/etc/init.d/mysqld restart
service mysqld restart
[/sourcecode]
Step 4: We have to configure the /etc/my.cnf file on the slave server. Here we will add the below parameters in the configuration file.
server-id - gives the Slave its unique ID
master-host - tells the Slave the I.P address of the Master server for connection. You can get the IP address using IPConfig command.
master-connect-retry - Here we will specify the connection retry interval.
master-user - Specify the user which has permission access the Master server
master-password - Specify the password of the replication user mentioned above
replicate-do-db - Specify the subscriber database name
relay-log - direct slave to use relay log
[sourcecode language="sql"]
server-id=2
master-host=128.20.30.1
master-connect-retry=60
master-user=repl_user
master-password=password
replicate-do-db=subscriber_slave
relay-log = /var/lib/mysql/slave-relay.log
relay-log-index = /var/lib/mysql/slave-relay-log.index
[/sourcecode]
Step 5: Restart the slave MySQl instance
[sourcecode language="sql"]
/etc/init.d/mysqld restart
service mysqld restart
[/sourcecode]
Step 6: If your Master MySQL instance is live instance, you have to do the backup/restore using MySQLDump utility.
[sourcecode language="sql"]
--Connect to MySQL Master server
mysql -u root -proot
--Stop the write operation
FLUSH TABLES WITH READ LOCK;
--Generate the dump of the database (backup)
--gzip command will compress the file and create the zip file name backup.sql.gz
mysqldump publisher_master -u root -p > /home/my_home_dir/backup.sql;
gzip /home/my_home_dir/backup.sql;
--execute below copy command on slave to copy the backup file
scp root@128.20.30.1:/home/my_home_dir/database.sql.gz /home/my_home_dir/
--Once copied, extract the file using gunzip
gunzip /home/my_home_dir/backup.sql.gz
--restore the databsae
mysql -u root -p subscriber_slave </home/my_home_dir/backup.sql
[/sourcecode]
Step 7: Execute the SHOW MASTER STATUS command on Master server. It will give you the bin log file name and position which we will use specify the slave.
[sourcecode language="sql"]
SHOW MASTER STATUS;
[/sourcecode]
+------------------+----------+--------------+------------------+
| File             | Position | Binlog_Do_DB | Binlog_Ignore_DB |
+------------------+----------+--------------+------------------+
| mysql-bin.000001 |      707 | exampledb    |                  |
+------------------+----------+--------------+------------------+
Step 8: Execute the below commands on slave.
[sourcecode language="sql"]
--Connect to MySQL Slave server
mysql -u root -proot
--stop the slave
slave stop;
-- Execute the below command
CHANGE MASTER TO MASTER_HOST='128.20.30.1', MASTER_USER='repl_user', MASTER_PASSWORD='password', MASTER_LOG_FILE='mysql-bin.000001', MASTER_LOG_POS=707;
--Start the Slave
slave start;
[/sourcecode]
Step 9: Login to Master MySQL instance and unlock the tables.
[sourcecode language="sql"]
--Connect to MySQL Master server
mysql -u root -proot
-- unlock the tables if you have executed lock tables command
unlock tables;
[/sourcecode]
You are all set. Master to Slave replication has been started. Make sure while configuring the my.cnf file.
1. Take the copy of my.cnf file before starting the replication configuration.
2. Make sure skip-networking parameter is not enabled in the my.cnf file.
T-SQL Script to Check/Create directory
Recently I came across a situation where I need to check whether the directory is exists or not, in case if the directory does not exist, I have to create new one.
As a solution, I have created below script to fix the issue.
[sourcecode language="sql"]
declare @chkdirectory as nvarchar(4000)
declare @folder_exists as int
set @chkdirectory = 'C:\SQLDBPool\SQL\Articles'
declare @file_results table
(file_exists int,
file_is_a_directory int,
parent_directory_exists int
)
insert into @file_results
(file_exists, file_is_a_directory, parent_directory_exists)
exec master.dbo.xp_fileexist @chkdirectory
select @folder_exists = file_is_a_directory
from @file_results
--script to create directory
if @folder_exists = 0
begin
print 'Directory is not exists, creating new one'
EXECUTE master.dbo.xp_create_subdir @chkdirectory
print @chkdirectory + 'created on' + @@servername
end
else
print 'Directory already exists'
GO [/sourcecode]
As a solution, I have created below script to fix the issue.
[sourcecode language="sql"]
declare @chkdirectory as nvarchar(4000)
declare @folder_exists as int
set @chkdirectory = 'C:\SQLDBPool\SQL\Articles'
declare @file_results table
(file_exists int,
file_is_a_directory int,
parent_directory_exists int
)
insert into @file_results
(file_exists, file_is_a_directory, parent_directory_exists)
exec master.dbo.xp_fileexist @chkdirectory
select @folder_exists = file_is_a_directory
from @file_results
--script to create directory
if @folder_exists = 0
begin
print 'Directory is not exists, creating new one'
EXECUTE master.dbo.xp_create_subdir @chkdirectory
print @chkdirectory + 'created on' + @@servername
end
else
print 'Directory already exists'
GO [/sourcecode]
Monday, June 27, 2011
Restoring a SQLServer database that uses Change Data Capture
Problem
When restoring a database that uses Change Data Capture (CDC), restoring a backup works differently depending on where the database is restored. In this tip we take a look at different scenarios when restoring a database when CDC is enabled.
Solution
For solution, please check my new article on MSSQLTips.com
http://mssqltips.com/tip.asp?tip=2421
When restoring a database that uses Change Data Capture (CDC), restoring a backup works differently depending on where the database is restored. In this tip we take a look at different scenarios when restoring a database when CDC is enabled.
Solution
For solution, please check my new article on MSSQLTips.com
http://mssqltips.com/tip.asp?tip=2421
Tuesday, June 14, 2011
How to Move Resource Database?
Resource Database: Resource database is available from the SQL Server 2005 and higher level versions. Resource database is read only and hidden database. Resource database contains all the system objects that shipped with SQL Server. SQL Server system objects, such as sys.objects, are physically persisted in the Resource database, but they logically appear in the sys schema of every database.
Resource database will be very useful in doing upgrades or in un-installing up-grades. In the previous versions of SQL Server up-grade needs creating/dropping of the system objects. From the SQL Server 2005 version upgrade is just procedure to copying resource database file to local server.
Name of Resource database data and log file.
mssqlsystemresource.mdf
mssqlsystemresource.ldf
Resource database data and log file location is same as the Master database location. In case if you are moving Master database you have to move the Resource database as well to the same location.
You can check the Resource database version and last up-grade time using the SERVERPROPERTY function.
[sourcecode language="sql"]
SELECT SERVERPROPERTY(‘RESOURCEVERSION’);
GO
SELECT SERVERPROPERTY(‘RESOURCELASTUPDATEDATETIME’);
GO [/sourcecode]
To move the resource database, you have to start the SQL Server service using either -m (single user mode) or -f (minimal configuration) and using -T3608 trace flag which will skip the recovery of all the databases other than the master database.
You can do it either from the Configuration manager or from the command prompt using below command.
Default Instance
Named Instance
Execute the below ALTER command once you have started the SQL Service by specifying the new location, location should be same as Master database location.
[sourcecode language="sql"]
ALTER DATABASE mssqlsystemresource MODIFY FILE (NAME=data, FILENAME= '\mssqlsystemresource.mdf')
ALTER DATABASE mssqlsystemresource MODIFY FILE (NAME=log, FILENAME= '\mssqlsystemresource.ldf')[/sourcecode]
Resource database will be very useful in doing upgrades or in un-installing up-grades. In the previous versions of SQL Server up-grade needs creating/dropping of the system objects. From the SQL Server 2005 version upgrade is just procedure to copying resource database file to local server.
Name of Resource database data and log file.
mssqlsystemresource.mdf
mssqlsystemresource.ldf
Resource database data and log file location is same as the Master database location. In case if you are moving Master database you have to move the Resource database as well to the same location.
You can check the Resource database version and last up-grade time using the SERVERPROPERTY function.
[sourcecode language="sql"]
SELECT SERVERPROPERTY(‘RESOURCEVERSION’);
GO
SELECT SERVERPROPERTY(‘RESOURCELASTUPDATEDATETIME’);
GO [/sourcecode]
To move the resource database, you have to start the SQL Server service using either -m (single user mode) or -f (minimal configuration) and using -T3608 trace flag which will skip the recovery of all the databases other than the master database.
You can do it either from the Configuration manager or from the command prompt using below command.
Default Instance
NET START MSSQLSERVER /f /T3608Named Instance
NET START MSSQL$instancename /f /T3608Execute the below ALTER command once you have started the SQL Service by specifying the new location, location should be same as Master database location.
[sourcecode language="sql"]
ALTER DATABASE mssqlsystemresource MODIFY FILE (NAME=data, FILENAME= '\mssqlsystemresource.mdf')
ALTER DATABASE mssqlsystemresource MODIFY FILE (NAME=log, FILENAME= '\mssqlsystemresource.ldf')[/sourcecode]
Wednesday, June 8, 2011
How to kill all sessions that have open connection in a SQL Server Database?
As SQL Server DBAs, many times we need to KILL all Open Sessions against the SQL Server Database to proceed with Maintenance Task, Restore and more...
You can use below different techniques to KILL all open sessions against the database.
Technique - I
Here we will query the SysProcesses table to get the session running against the user database and prepare the dynamic SQL statement to KILL all the connection.
[sourcecode language="sql"]
DECLARE @DbName nvarchar(50)
SET @DbName = N'Write a DB Name here'
DECLARE @EXECSQL varchar(max)
SET @EXECSQL = ''
SELECT @EXECSQL = @EXECSQL + 'Kill ' + Convert(varchar, SPId) + ';'
FROM MASTER..SysProcesses
WHERE DBId = DB_ID(@DbName) AND SPId @@SPId
EXEC(@EXECSQL)
[/sourcecode]
Technique - II
Take the database into Single User Mode and execute all the task needs to perform against the databse.
[sourcecode language="sql"]ALTER DATABASE [Database Name] SET SINGLE_USER WITH ROLLBACK IMMEDIATE [/sourcecode]
Once you are finish with all the required task make the database accessible to everyone.
[sourcecode language="sql"]ALTER DATABASE [Database Name] SET MULTI_USER[/sourcecode]
Technique - III
In case of restore the database by replacing existing database, you can take the database OFFLINE and restore it. Restore will bring the database online.
[sourcecode language="sql"]
ALTER DATABASE [Database Name] SET OFFLINE WITH ROLLBACK IMMEDIATE [/sourcecode]
[sourcecode language="sql"]
ALTER DATABASE [Database Name] SET ONLINE
[/sourcecode]
Technique - IV
Go to Activity Monitor, Select the desired database and right click on the database to KILL the process.

You can use below different techniques to KILL all open sessions against the database.
Technique - I
Here we will query the SysProcesses table to get the session running against the user database and prepare the dynamic SQL statement to KILL all the connection.
[sourcecode language="sql"]
DECLARE @DbName nvarchar(50)
SET @DbName = N'Write a DB Name here'
DECLARE @EXECSQL varchar(max)
SET @EXECSQL = ''
SELECT @EXECSQL = @EXECSQL + 'Kill ' + Convert(varchar, SPId) + ';'
FROM MASTER..SysProcesses
WHERE DBId = DB_ID(@DbName) AND SPId @@SPId
EXEC(@EXECSQL)
[/sourcecode]
Technique - II
Take the database into Single User Mode and execute all the task needs to perform against the databse.
[sourcecode language="sql"]ALTER DATABASE [Database Name] SET SINGLE_USER WITH ROLLBACK IMMEDIATE [/sourcecode]
Once you are finish with all the required task make the database accessible to everyone.
[sourcecode language="sql"]ALTER DATABASE [Database Name] SET MULTI_USER[/sourcecode]
Technique - III
In case of restore the database by replacing existing database, you can take the database OFFLINE and restore it. Restore will bring the database online.
[sourcecode language="sql"]
ALTER DATABASE [Database Name] SET OFFLINE WITH ROLLBACK IMMEDIATE [/sourcecode]
[sourcecode language="sql"]
ALTER DATABASE [Database Name] SET ONLINE
[/sourcecode]
Technique - IV
Go to Activity Monitor, Select the desired database and right click on the database to KILL the process.

Wednesday, June 1, 2011
Change Data Capture in SQL Server 2008
Change Data Capture (CDC) is a new feature in SQL Server 2008 which records insert, update and delete activity in SQL Server tables.
CDC is intended to capture insert, update and delete activity on a SQL table and place the information into a separate relational table. It uses an asynchronous capture mechanism that reads the transaction logs and populates the CDC table with the row's data which change. The CDC table mirrors the column structure of the tracked table, together with metadata regarding the change.
To use the CDC feature, first we have to enable it database level. You can use below query to retrieve the CDC enabled databases.
[sourcecode language="sql"]
USE master
GO
SELECT [name], database_id, is_cdc_enabled
FROM sys.databases where is_cdc_enabled <> 0
GO[/sourcecode]

You can use below script to create the sample database and table
[sourcecode language="sql"]
use sqldbpool
create table Employee
(
empID int constraint PK_Employee primary key Identity(1,1)
,empName varchar(20)
,salary int
)
insert into Employee values('Jugal','50000000'),('Abhinav',1000),('Sunil',2000)[/sourcecode]
To enable CDC on database SQLDBPool execute the below query.
[sourcecode language="sql"]
USE SQLDBPool
GO
EXEC sys.sp_cdc_enable_db[/sourcecode]
Once you have enabled the CDC for the database, you can see the CDC schema, CDC User and CDC tables in the database. Please see the below images for more information.


cdc.captured_columns – Returns list of captured column
cdc.change_tables – Returns list of all the CDC enabled tables
cdc.ddl_history – Records history of all the DDL changes since capture data enabled
cdc.index_columns – Contains indexes associated with change table
cdc.lsn_time_mapping – Maps LSN number and time
As CDC feature can be applied at the table-level to any CDC enabled database. You can run below query to enable the CDC on the table.
Please note:
- You must have database owner permission (db_Owner fixed role)
- SQL Agent Service must be running
Using sys.sp_cdc_enable_table procedure we can enable the CDC at the table level. You can specify all the below different options as required.
@source_schema is the schema name of the table that you want to enable for CDC
@source_name is the table name that you want to enable for CDC
@role_name is a database role which will be used to determine whether a user can access the CDC data; the role will be created if it doesn't exist.
@supports_net_changes determines whether you can summarize multiple changes into a single change record; set to 1 to allow, 0 otherwise.
@capture_instance is a name that you assign to this particular CDC instance; you can have up two instances for a given table.
@index_name is the name of a unique index to use to identify rows in the source table; you can specify NULL if the source table has a primary key.
@captured_column_list is a comma-separated list of column names that you want to enable for CDC; you can specify NULL to enable all columns.
@filegroup_name allows you to specify the FILEGROUP to be used to store the CDC change tables.
@partition_switch allows you to specify whether the ALTER TABLE SWITCH PARTITION command is allowed
[sourcecode language="sql"]
USE SQLDBPool
GO
EXEC sys.sp_cdc_enable_table
@source_schema = N'dbo',
@source_name = N'Employee',
@role_name = NULL
GO[/sourcecode]

cdc.SQLDBPool_capture – Capture the changes by doing log scan
cdc. SQLDBPool _cleanup –Clean Up the database changes tables.
Once the above query executes successfully, it will create 1 more system table cdc.dbo.Employee_CT for the tracking purpose.
See the result of the SELECT query on both the tables.

Below 5 additional columns are available into cdc.dbo.Employee_CT table.

__$operation and __$update_mask are very important columns. __$operation table contains the value against the DML operations.
1 = Delete Statement
2 = Insert Statement
3 = Value before Update Statement
4 = Value after Update Statement
__$update_mask A bit mask with a bit corresponding to each captured column identified for the capture instance. This value has all defined bits set to 1 when __$operation = 1 or 2. When __$operation = 3 or 4, only those bits corresponding to columns that changed are set to 1.
[sourcecode language="sql"]
insert into Employee values('DJ','10000')
delete Employee where empName = 'DJ'
update Employee set salary = 10 where Empname = 'Sunil'[/sourcecode]
[sourcecode language="sql"]
select * from Employee
select * from cdc.dbo_Employee_CT[/sourcecode]

You can get more information on the CDC configuration by executing sys.sp_cdc_help_change_data_capture stored procedure.

You can disable the CDC either on the table level or the database level. Use below code to disable the CDC on table or database level.
Table Level
[sourcecode language="sql"]
exec sys.sp_cdc_disable_table
@source_schema = 'dbo',
@source_name = 'Employee',
@capture_instance = 'dbo_Employee' [/sourcecode]
Database Level
[sourcecode language="sql"]
use SQLDBPool;
go
sys.sp_cdc_disable_db[/sourcecode]
CleanUp Job
As we checked in the above example that CDC is capturing all the changes at the table level which create the disk space issue. To resolve disk space issue we have clean up job which run every 3 days interval by default. We can schedule it to run as per our requirement.
CDC is intended to capture insert, update and delete activity on a SQL table and place the information into a separate relational table. It uses an asynchronous capture mechanism that reads the transaction logs and populates the CDC table with the row's data which change. The CDC table mirrors the column structure of the tracked table, together with metadata regarding the change.
To use the CDC feature, first we have to enable it database level. You can use below query to retrieve the CDC enabled databases.
Steps to Enable the CDC on database level
[sourcecode language="sql"]
USE master
GO
SELECT [name], database_id, is_cdc_enabled
FROM sys.databases where is_cdc_enabled <> 0
GO[/sourcecode]

You can use below script to create the sample database and table
create database SQLDBPool
go
Sample DB and Table Creation Script
[sourcecode language="sql"]
use sqldbpool
create table Employee
(
empID int constraint PK_Employee primary key Identity(1,1)
,empName varchar(20)
,salary int
)
insert into Employee values('Jugal','50000000'),('Abhinav',1000),('Sunil',2000)[/sourcecode]
To enable CDC on database SQLDBPool execute the below query.
[sourcecode language="sql"]
USE SQLDBPool
GO
EXEC sys.sp_cdc_enable_db[/sourcecode]
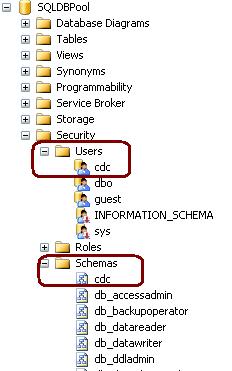
Once you have enabled the CDC for the database, you can see the CDC schema, CDC User and CDC tables in the database. Please see the below images for more information.
CDC Schema, CDC User and CDC system tables

cdc.captured_columns – Returns list of captured column
cdc.change_tables – Returns list of all the CDC enabled tables
cdc.ddl_history – Records history of all the DDL changes since capture data enabled
cdc.index_columns – Contains indexes associated with change table
cdc.lsn_time_mapping – Maps LSN number and time
Enable CDC on Table
As CDC feature can be applied at the table-level to any CDC enabled database. You can run below query to enable the CDC on the table.
Please note:
- You must have database owner permission (db_Owner fixed role)
- SQL Agent Service must be running
Using sys.sp_cdc_enable_table procedure we can enable the CDC at the table level. You can specify all the below different options as required.
@source_schema is the schema name of the table that you want to enable for CDC
@source_name is the table name that you want to enable for CDC
@role_name is a database role which will be used to determine whether a user can access the CDC data; the role will be created if it doesn't exist.
@supports_net_changes determines whether you can summarize multiple changes into a single change record; set to 1 to allow, 0 otherwise.
@capture_instance is a name that you assign to this particular CDC instance; you can have up two instances for a given table.
@index_name is the name of a unique index to use to identify rows in the source table; you can specify NULL if the source table has a primary key.
@captured_column_list is a comma-separated list of column names that you want to enable for CDC; you can specify NULL to enable all columns.
@filegroup_name allows you to specify the FILEGROUP to be used to store the CDC change tables.
@partition_switch allows you to specify whether the ALTER TABLE SWITCH PARTITION command is allowed
[sourcecode language="sql"]
USE SQLDBPool
GO
EXEC sys.sp_cdc_enable_table
@source_schema = N'dbo',
@source_name = N'Employee',
@role_name = NULL
GO[/sourcecode]

cdc.SQLDBPool_capture – Capture the changes by doing log scan
cdc. SQLDBPool _cleanup –Clean Up the database changes tables.
Once the above query executes successfully, it will create 1 more system table cdc.dbo.Employee_CT for the tracking purpose.
See the result of the SELECT query on both the tables.

Below 5 additional columns are available into cdc.dbo.Employee_CT table.

__$operation and __$update_mask are very important columns. __$operation table contains the value against the DML operations.
1 = Delete Statement
2 = Insert Statement
3 = Value before Update Statement
4 = Value after Update Statement
__$update_mask A bit mask with a bit corresponding to each captured column identified for the capture instance. This value has all defined bits set to 1 when __$operation = 1 or 2. When __$operation = 3 or 4, only those bits corresponding to columns that changed are set to 1.
Example
Execute the below query on the SQLDBPool database.[sourcecode language="sql"]
insert into Employee values('DJ','10000')
delete Employee where empName = 'DJ'
update Employee set salary = 10 where Empname = 'Sunil'[/sourcecode]
[sourcecode language="sql"]
select * from Employee
select * from cdc.dbo_Employee_CT[/sourcecode]

You can get more information on the CDC configuration by executing sys.sp_cdc_help_change_data_capture stored procedure.

You can disable the CDC either on the table level or the database level. Use below code to disable the CDC on table or database level.
Table Level
[sourcecode language="sql"]
exec sys.sp_cdc_disable_table
@source_schema = 'dbo',
@source_name = 'Employee',
@capture_instance = 'dbo_Employee' [/sourcecode]
Database Level
[sourcecode language="sql"]
use SQLDBPool;
go
sys.sp_cdc_disable_db[/sourcecode]
CleanUp Job
As we checked in the above example that CDC is capturing all the changes at the table level which create the disk space issue. To resolve disk space issue we have clean up job which run every 3 days interval by default. We can schedule it to run as per our requirement.
Monday, May 30, 2011
Monday, May 23, 2011
SQL Server Central Management Servers System Tables
ProblemI have SQL Server Central Management Servers setup in my environment. How can I get a list of the registered servers and their associated properties? Are there any queries I can issue? Check out this tip to learn more.
Solutions
http://www.mssqltips.com/tip.asp?tip=2397
Solutions
http://www.mssqltips.com/tip.asp?tip=2397
Tuesday, May 17, 2011
Bug Fix:The I/O operation has been aborted because of either a thread exit or an application request
Error
Read on "VDI_FCA0B3E9" failed: 995(The I/O operation has been aborted because of either a thread exit or an application request.)
The media family on device LiteSpeed for SQL Server backup file is incorrectly formed. SQL Server cannot process this media family.
Solution
In recent times I came across the above error, while restoring the database. We are using the Quest LiteSpeed for the backup/restore. As per the request from the user we have started the restore of the database from the production box to development box.
Restore Query is failing with the above error. I have follow the below checklist to fix the error.
I got the positive result on all the above tests but still the restore is failing. At last I checked the one day old emails and found that, production box was migrated from SQL Server 2005 to SQL Server 2008. As you may know that we can't restore the database from higher version to lower version because of that restore was failed.
Finally I have restore the database on the different SQL Server 2008 development box and up-grade the SQL Server 2005 box with SQL Server 2008
If you come across such kind of error, make sure you are checking the SQL Server version and LiteSpeed version on both source and destination machine.
Read on "VDI_FCA0B3E9" failed: 995(The I/O operation has been aborted because of either a thread exit or an application request.)
The media family on device LiteSpeed for SQL Server backup file is incorrectly formed. SQL Server cannot process this media family.
Solution
In recent times I came across the above error, while restoring the database. We are using the Quest LiteSpeed for the backup/restore. As per the request from the user we have started the restore of the database from the production box to development box.
Restore Query is failing with the above error. I have follow the below checklist to fix the error.
- Check for the LiteSpeed version on both the boxes
- Verified the backup file
- Verified the backup file path
I got the positive result on all the above tests but still the restore is failing. At last I checked the one day old emails and found that, production box was migrated from SQL Server 2005 to SQL Server 2008. As you may know that we can't restore the database from higher version to lower version because of that restore was failed.
Finally I have restore the database on the different SQL Server 2008 development box and up-grade the SQL Server 2005 box with SQL Server 2008
If you come across such kind of error, make sure you are checking the SQL Server version and LiteSpeed version on both source and destination machine.
Wednesday, May 4, 2011
Customize SSMS query window for standard comment block and frequently used commands
Problem
As a best practice, most companies follow a standard comment format at the beginning of stored procedures and functions. In addition, it is also a good idea to include comments in all scripts you write even if they are just save as .sql or .txt files. Manually we often add a standard comment block to the header of our scripts using copy and paste, but in this tip we look at how to automate adding a standard comment block for every set of code we write using SSMS.
Solution
http://www.mssqltips.com/tip.asp?tip=2372
Subscribe to:
Posts (Atom)